This is Peruvian Beef Empanada recipe from Chef Alex of Waverly Cooking School.
Empanada is one of my favorite snack that I will always try to grab one whenever i see them at a store. My first exposure to empanada was from a Filipino bakery. It has chicken fillings and tasted on the slight sweet side. I was under the impression that empanada is a Filipino dish and it took me a while to figure out that it is not when I started seeing empanada in menu offering for other ethic restaurant menus. Empanada has some similarities to a deep fried curry beef puff/pie version I had in Singapore when growing up. As i started to pay more attention to different ethnics and regional food offerings, i started to notice empanada listed often. To my delight, I was excited when Chef Alex showed us his version of the Peruvian Empanada. From what he told us, most empanada are fried. However, this version is not fried, but instead baked in the oven.
Ingredients:
Fillings:
1 lb ground beef
1 teaspoon kosher salt
1 teaspoon cumin
½ teaspoon black pepper
1 Teaspoon cayenne pepper
1 medium red onion finely diced(about 300 gm)
6 Cloves of garlic minced (approx 1.5 Tablespoon)
1.5 Tablespoon Chipotle diced peppers
2 Tablespoons of tomato paste
1 cup White wine
1 teaspoon paprika (optional)
Diced olives 3-6 (optional)
This is the diced chipotle peppers used
Dough:
500gm All purpose flour
3.5 Tablespoon Sugar (50 gm)
1 Tablespoon kosher salt (12 gm)
1 whole egg (about 3 oz)
250 gm butter, cut into small cube
1 cup of cold water
Making the Dough
Steps:
Cut the butter into small cube
Put the flour, kosher salt, sugar, egg, and butter cubes in bowl and mix until the mixtures is like coarse sand. Basically, you want the butter to not be lumpy. You want to butter and flour to break down into very small crumb
Next slowly pour water into the crumbs mixture and mix. It will get soft and sticky. You may not use all the water. You do not want the mixture to be too wet. Knead the dough for about 15 minutes or until it will slightly spring back when you press onto it. If the dough is still sticky it is not ready, may need to apply some flour to it and keeping kneading sprinkling a little flour as you go along till you get the right consistency. The dough should be dry. Make it into a round shape.
When ready put the dough in the refrigerator for 45 minutes.
In the meantime you can start on the fillings
Put all the dough ingredients except for cold water in bowl
Use hands to mix into crumbs
This is the crumb size you want to get to at the least
Making the Fillings
Steps:
In a bowl, add the ground beef, kosher salt, cumin, paprika, cayenne peppers and mix set aside.
Diced the onions , garlics, olives (optional), and cilantro (optional)
Heat about 2 tablespoon of cooking oil in a frying pan. Add the ground beef and fry till brown on medium heat. There will be meat juices during the frying stage, increase the heat slightly to dry up the liquid. When liquid are mostly removed, add the chipotle peppers and mix thoroughly. Remove beef to a bowl.
In the same pan, add a little oil and fry the onion and 1 teaspoon salt until it is almost translucent. Next add the garlic and fry till the onion are soft . Should be about 5-10 minutes. Do not burn the onions and garlic. Add white wine until it covers the onions and let it cook for a few minutes until the wine reduced to about 1/3 or less. Add back the ground beef and tomato paste and diced olives (optional) mix well.
At this stage, you may want to add about ½ teaspoon of salt and 1/2 teaspoon of cumin powder to season to your liking. Add cilantro (optional)
Turn off heat and set aside.
Fry the seasoned ground beef until light brown.
Finely diced onion and garlic.
Finished beef filling
Putting it together
Steps:
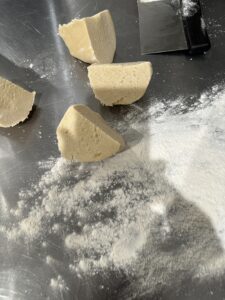
After 45 minutes, remove the dough from the refrigerator. The dough should be firm and but not rock hard.
Cut the dough into 4 quarters
Using a rolling pin, start to flatten the on quarter into about ½ cm thickness. You may need to sprinkle some flour on the tabletop. Next us a cookie cutter about 4 inches in diameter and cut out round pieces. Place it on baking tray lined with patchment paper
Repeat for the other 3 quarters.
Mixed up all the leftover dough and repeat until there are not enough dough left.
Place the tray in the refrigerator for 5-10 minutes.
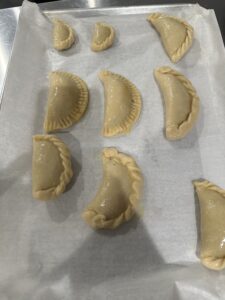
After 5-10 minutes, remove the tray and start adding the filling to the dough. It usually need about 1.5 tablespoon of filling to make on empanada. Folder the round dough to cover the filing making sure that the edges are sealed tight. Next use a fork to pinched the edges or use the hand folding method to fold the edges .
When done, place the empanada in the refrigerator for another 5-10mins.
Preheat the oven to 375o F
After 5-10mins and the oven preheated, remove the empanada from the refrigerator and apply egg wash.
baked in oven for 20 minutes
The dough should be a little firm but not hard or too soft.
Cut dough into quarters
Use a cookie cutter about 4inch in diameter
Place a tablespoon of filling
Fold the dough to cover the filling and pinch the edges close
You can use a fork to crimp the edges or hand fold
After removing from oven, let it cool down for 5 – 10 minutes before sinking your teeth into it. You can sprinkle a little powder suger and squeeze a little lime on the filling as you eat into it. You can get creative and add jalapeno into the fillings for a little extra heat. The amount of seasonings and spices you add to the filling will change the complexity of the flavor. Get creatives.
After trying this recipe with the beef filling, my wife wanted to try this with a ground pork, oyster and chives filling. It turn out pretty well, only issue i had was the filling used is raw and during the baking process, the meat juice tends to seep through the dough, but still turn out pretty good.
So i recommend that once you get the hang of this recipe, experiment with other fillings. Next I am going to try it will homemade Char Siew Pork aka Chinese BBQ Pork.